DIY Halloween Tree Porch Decor is the answer to those last-minute decorating panics and the overflowing junk drawer of holiday supplies! Does your entryway feel a little… bare and uninspired as October rolls around, leaving you scrambling for a festive yet affordable touch? Imagine your front porch transformed into a whimsical, spooky spectacle with a charming DIY Halloween tree. Picture a rustic branch adorned with shimmering spiderwebs, miniature pumpkins, and glowing ghost ornaments, all welcoming trick-or-treaters with a delightful fright. This project is incredibly budget-friendly, often costing less than $20, and can be completed in under an hour. In this article, I’ll guide you through exactly how to create your own spooky centerpiece, sharing simple steps and clever organization tips to make your Halloween decorating a breeze.
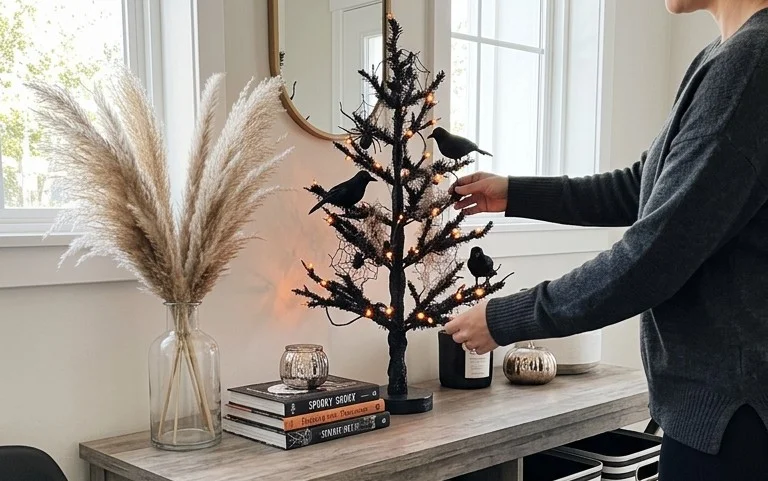
DIY Halloween Tree Porch Decor | Easy, Budget-Friendly & Spooky
This year, I wanted to elevate my porch game for Halloween. Forget the fleeting pumpkin displays that rot after a week; I was after something with a bit more longevity, a touch more drama, and that satisfying feeling of creating something spooky and spectacular myself. Enter the DIY Halloween tree! It’s become a surprisingly popular decor trend, and for good reason. It’s incredibly versatile, can be scaled to your space and budget, and allows for so much creative expression. Best of all? It’s surprisingly easy and budget-friendly to pull off. I’m going to walk you through exactly how I did it, so you can create your own show-stopping Halloween tree that will have the neighbourhood talking.
What You’ll Need and Roughly What It Costs
The beauty of this project is its adaptability, meaning the cost can fluctuate wildly depending on what you already have and your scavenging skills. However, here’s a breakdown of the essentials and some ballpark figures:
- The Tree: This is your foundational piece.
- Option 1: A Real Branch Tree: Foraged from your yard or a local park (check for regulations!). Free if you can find one suitable.
- Option 2: A Small Faux Tree: Think of those inexpensive twig trees you see at craft stores or discount retailers. A 3-4 foot tree might cost between $15-$30. I opted for a 4-foot black faux twig tree from a craft store.
- Option 3: A Larger, Real Tree Base: If you have a small, bare tree in your yard or a large pot with a suitable branch structure, you can work with that. Cost is free.
- The Base/Stand: This is crucial for stability.
- Heavy Pot or Planter: Something substantial that won’t tip easily. A 10-15 inch diameter pot is a good starting point. You can find these at garden centers or even thrift stores for $10-$25.
- Concrete or Large Rocks/Sand: To weigh down the pot. A 50lb bag of concrete mix is around $5-$8, or a bag of decorative rocks/sand can be $10-$20.
- Bucket (if using concrete): An old 5-gallon bucket is perfect, usually free or a couple of dollars.
- The Decor: This is where you can really have fun and be thrifty!
- Halloween Ornaments: Think small, lightweight items. Plastic spiders, bats, mini pumpkins, skulls, ghosts, tinsel, ribbon. You can find multipacks at dollar stores for $5-$15. I also repurposed some old Christmas ornaments by spray painting them.
- Spray Paint: Black, orange, purple, or even a metallic for a chic spooky vibe. A couple of cans will cost around $8-$15.
- Wire or String: For hanging ornaments. Fishing line or thin craft wire is ideal ($3-$5).
- Optional Additions: Battery-operated fairy lights (orange or purple) can add a magical touch ($10-$20). Fake cobwebs ($3-$5). Small signs ($5-$10).
All in, you’re looking at a budget of roughly $50-$100 for a really decent-looking DIY Halloween tree, depending heavily on your chosen tree and how much you repurpose or buy new. I managed to keep mine under $70 by using a faux tree I already had and getting creative with dollar store finds.
Measuring and Planning Before You Start
Before you dive in with spray paint and glitter, take a moment to plan. This is especially important for porch decor, as you need to consider the space you have and the elements it will be exposed to.
- Measure Your Space: How much room do you *actually* have? Measure the width and depth of your porch where you envision the tree sitting. Consider the height of your door or any overhead features. A tall, skinny tree might be perfect for a narrow porch, while a wider, shorter one could work for a more expansive area. I measured my porch to be roughly 4 feet wide by 6 feet deep at the entrance. I decided a 4-foot tree would be the right scale.
- Consider Visibility: Will it be seen from the street? From your doorstep? Plan the “front” of your tree and where you’ll place the most impactful decorations.
- Weather Watch: Is your porch covered or exposed? If it’s exposed, opt for weather-resistant ornaments and secure them well. Lightweight items can blow away in strong winds.
- Theme and Colour Palette: Decide on your spooky aesthetic. Are you going for classic orange and black? A more gothic purple and silver? A creepy, cobweb-filled graveyard vibe? This will guide your ornament choices and colour scheme. I decided on a classic spooky feel with black, orange, and a touch of deep purple.
- Sketch it Out (Optional but Recommended): A quick sketch can help you visualize placement and ensure you have enough decorations. I often draw a rough circle and dot where I plan to hang larger items or clusters of ornaments.
The Spooky Process: A Step-by-Step Guide
Here’s how I brought my Halloween tree to life:
- Prepare Your Base: If you’re using a pot and concrete, place your tree into the pot. You might need to prop it up with some old cardboard or extra branches initially. Mix the concrete according to the bag instructions in your bucket. Carefully pour the concrete around the base of the tree, ensuring it’s standing upright. Let it cure completely – this usually takes 24-48 hours. If you’re using rocks or sand, fill the pot with them, ensuring the tree is stable.
- Transform Your Tree (If Needed): If your tree isn’t the colour you want, now is the time to spray paint it. Take your faux or real branches outside to a well-ventilated area. Hang them or lay them flat and apply thin, even coats of spray paint. Let each coat dry completely before applying the next. I gave my black faux tree a light dusting of metallic purple spray paint for an ethereal glow.
- Drip-Dry and Secure: Once painted, allow your tree to dry thoroughly. If using a real branch tree, ensure there are no loose bits that could fall off and become a hazard.
- The Ornamentation Begins: This is the fun part! Start by attaching your heavier or anchor ornaments. These could be mini pumpkins, larger skull ornaments, or even small fabric ghosts. Use wire or strong string to secure them to thicker branches.
- Fill in the Gaps: Now, work your way around the tree, adding smaller ornaments like spiders, bats, and eyeballs. Distribute them evenly, but don’t be afraid of creating clusters for visual interest. Think about how the light will catch them.
- Add Texture and Movement: Drape fake cobwebs over the branches, letting them hang naturally. Attach long, flowing ribbons in your chosen colours. These add a sense of depth and a touch of creepiness.
- Consider Lights (Optional): If you’re using fairy lights, carefully weave them through the branches, starting from the base and working your way up. Ensure the battery pack is accessible for on/off switching.
- The Finishing Touches: Stand back and assess. Are there any bare spots? Do some ornaments need adjusting? Add a few small, spooky signs or even a friendly ghost figure at the base of the tree.
Adapting for Small Spaces and Rentals
Don’t have a sprawling porch? No problem! This DIY Halloween tree is perfect for even the most compact of spaces, and it’s rental-friendly because it requires no drilling or permanent fixtures.
- Smaller Tree: Opt for a 1-2 foot faux twig tree. These are readily available and much more manageable for apartment balconies or small stoops.
- Weighted Base is Key: Even with a smaller tree, a heavy pot is essential. You can use decorative rocks or sand to fill the pot, or even a sturdy, decorative bucket.
- Command Hooks for Lights/Cobwebs: If you want to add fairy lights or cobwebs to your porch walls or railings (and your lease allows!), use temporary adhesive hooks like Command strips.
- Focus on Ornaments: With a smaller canvas, every ornament counts. Choose impactful, well-made pieces that pack a punch.
- Tabletop Version: A mini Halloween tree on a console table inside your entryway can be just as effective.
Styling Notes for Maximum Spookiness
It’s not just about piling on the decorations; it’s about strategic placement and creating a cohesive look.
- Colour Blocking and Clusters: Don’t scatter every orange ornament randomly. Group them together for visual impact. Similarly, a cluster of bats flying out from one side of the tree can be more dramatic than a few scattered ones.
- Vary Heights and Textures: Mix flat ornaments with 3D ones. Combine shiny tinsel with matte fabric ghosts. Drape some cobwebs high and let others cascade low. This adds visual interest.
- The “Rule of Three”: Often, odd numbers of decorative elements are more pleasing to the eye. Try grouping three smaller ornaments together, or have three prominent hanging items.
- Layering is Your Friend: Think of the tree as having layers. Start with the main ornaments, then add the cobwebs and lights, and finally, the delicate dangling elements.
- Consider Lighting: If your porch has a light fixture, see how it interacts with your tree. You might want to add a spotlight aimed at the tree at night for maximum impact. Battery-operated lights offer flexibility.
Keeping it Tidy After Week One
The initial “wow” factor is fantastic, but how do you keep it looking good as Halloween approaches?
- Regular Ornament Checks: After the first week, do a quick walk-around. Are any ornaments dangling precariously? Secure them with extra wire or string. Are any cobwebs starting to sag or droop? Re-tuck them.
- Wind Patrol: If you experience windy weather, check that no lightweight ornaments have been blown off or are tangling. You might need to secure them more firmly.
- Dusting (Carefully!): If your tree is under a covered porch, a gentle dusting with a soft brush or a microfiber cloth might be necessary to remove any accumulated dust or pollen. Be very careful not to dislodge ornaments.
- Tuck and Arrange: Simply adjusting the placement of a few key ornaments or re-draping a strand of cobweb can make a big difference in keeping it looking fresh and intentional.
The Mistakes That Make This Fail
Even the easiest DIY projects can go awry. Here are a few common pitfalls to avoid:
- Overcrowding: It’s tempting to go all-out, but too many ornaments can make the tree look messy and chaotic. Less is often more, especially with a strong theme.
- Heavy Ornaments on Weak Branches: This is a recipe for disaster. Ensure you’re attaching heavier items to the thicker, sturdier branches of your tree, or directly to the trunk if possible.
- Ignoring Stability: A tree that wobbles or tips over is not only unsightly but also a safety hazard. Invest in a good, heavy base.
- Ignoring the Weather: Using delicate paper ornaments on an exposed porch is a bad idea. Choose materials that can withstand the elements.
- Lack of Cohesion: Throwing every random Halloween item you own onto the tree will likely result in a jumbled mess. Stick to your chosen colour palette and theme for a more polished look.
- Forgetting the “After”: Not planning for maintenance means your spooky creation can quickly become a sad, saggy mess. A few minutes of upkeep each week makes all the difference.
Creating a DIY Halloween tree for your porch is a rewarding and incredibly fun project. It’s a chance to unleash your inner decorator, embrace your love for all things spooky, and create a focal point that will bring joy (and a shiver!) to everyone who passes by. So grab your supplies, get creative, and have a spectacularly spooky Halloween!
Conclusion
Adding a touch of spooky charm to your porch with a DIY Halloween tree doesn’t just transform your curb appeal; it also brings a little daily delight. Imagine coming home each evening to that festive, welcoming sight! The beauty of this project is its simplicity and affordability, making it a truly achievable way to embrace the season.
Ready to get started? Your smallest first step today could be simply gathering a few fallen branches or scouting for inexpensive ornaments at a thrift store. If you’re looking to extend the festive spirit indoors, consider a smaller, tabletop DIY Halloween tree for your mantelpiece, or perhaps a spooky garland made from recycled materials for a different budget-friendly touch.
We hope this easy, budget-friendly, and spooky DIY Halloween tree porch decor inspires you! For more creative ideas to make your home shine this season and beyond, be sure to explore the rest of our articles.